Step 2. Securing the posts to ground
There are 3 different methods for you to choose from:
- Original Spiked Fixing Posts
- Bolt - Down Fixing Posts
- Concrete - in Fixing Post
We have chosen these methods of securing as the Fixing Posts are easy to install and keep the bottom of the posts out of the ground, reducing the risk of rotting. The method that you choose depends on your local conditions and where your pergola is to be sited. If you have good, solid earth - choose the first option. If you want your pergola positioned over a patio or concrete – choose the second option as the Fixing Post is secured by using a hammer drill and masonry bit to drill through the hard surface and then secured using the special masonry bolts provided. If your soil is of a poor constituency you should go for the final option. If this is the case, you will need to dig a hole and buy a bag of quick setting concrete (sourced from any builder’s merchant or garden centre) and follow the simple instructions for a safe and secure fix.
When ordering, you will be prompted as to which method you require in order to secure the posts to the ground. See Fig 9 below for details:
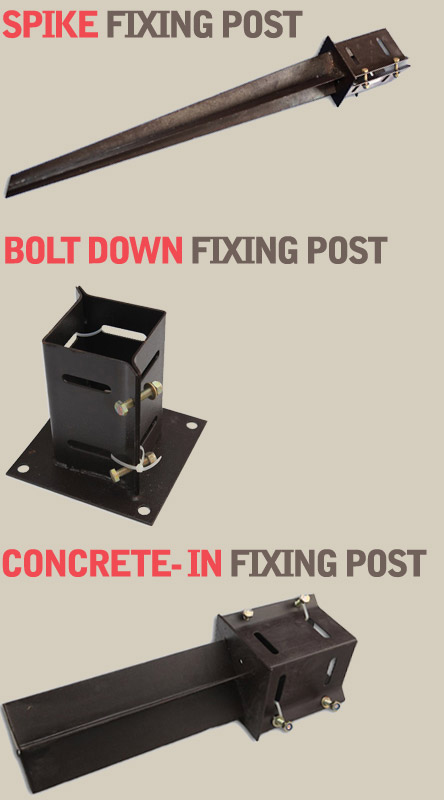
Post supports – Installation instructions:
1) Original – ‘Spiked’ version These have been designed to allow you to install your posts securely in the ground in no time and without the hassle of digging holes or buying concrete. Simply, place the tip of the spike over the point in the ground where you want your post position to be and, using a wooden bung or piece of off-cut timber to protect the rim of the spike, take your sledgehammer and gently drive in the support, making sure to check the vertical alignment with a spirit level as you do so, until the box section of the support is level with the ground. .
2) ‘Bolt – Down’ Support As this version of post support is flush fitting, it is ideally used for situations where your pergola is to be sited on an existing patio or concrete. Using the base as a template, mark the holes on the surface, drill and then secure using the bolts provided ensuring that they are tightly screwed in. The bolts provided for stone or concrete fixing are 8mm self-tapping ankerbolts for a positive fixing. You should use a 6mm masonry drill bit to pre-drill the four fixing holes then position the post support over the holes and insert the bolts through the fixture and into the holes. Tighten until a positive clamping force is achieved. If required, we also offer a 'Bolt-Down' post support with flanges on two sides only. This is for a pergola that needs to be fixed very close to a wall for example and will allow it to fit flush. Please email us for details.
3) ‘Concrete – In’ Support These supports are best used in areas where the ground conditions prevent the use of the original ‘Spiked’ post support. So, for example, if your ground is particularly stony or prone to very wet earth it is best to opt for this version. You will need to visit your local builder’s merchant or garden centre and purchase a bag of quick drying concrete. Once done, dig out a hole (where you want to place the post) approximately 12ins x 12ins in size, and place enough of the prepared quick drying concrete to fill the hole. Next, insert your post support into the centre of the hole and check that it is vertical aligned. Once, the concrete has set (usually an hour but check the manufacturer’s instructions) the post can be placed in the support.
All 3 of the above versions above will ensure years of maintenance free, secure anchorage. If, for whatever reason, you have cause to change the timber post, you can simply loosen the holding bolts, take it out and replace with another without having to re-dig, drill or concrete in any new post supports.
To check that the posts are completely straight, it is a good idea to use a ‘post level’ as it is vital to the whole structure that the posts are in line and vertical. Please make sure that the ‘notched’ side of the post faces inwards as you will be attaching the main beam to this side in Step 4.
As previously mentioned, if you have difficulty in fitting the post into the supports due to the timber expanding a touch, you can either sand down the offending edge or carefully take a stanley knife and trim the edge until it fits. Please make sure that if you have reached the bare wood, where the timber treatment has not penetrated, that you paint on a wood preservative so that it is not exposed to the elements.
(*NB these drawings are for representation purposes only and not to scale)